CuTile学习—从 GEMM 开始
1. 前置要求
1.1 硬件要求:
Blackwell 算力架构及以上。
1.2 软件要求:
CUDA Toolkit version大于等于13.1Driver version大于等于 580- 安装
cuda-tilecupy的 python 包
2. 语法模型
2.1 Tile & Block
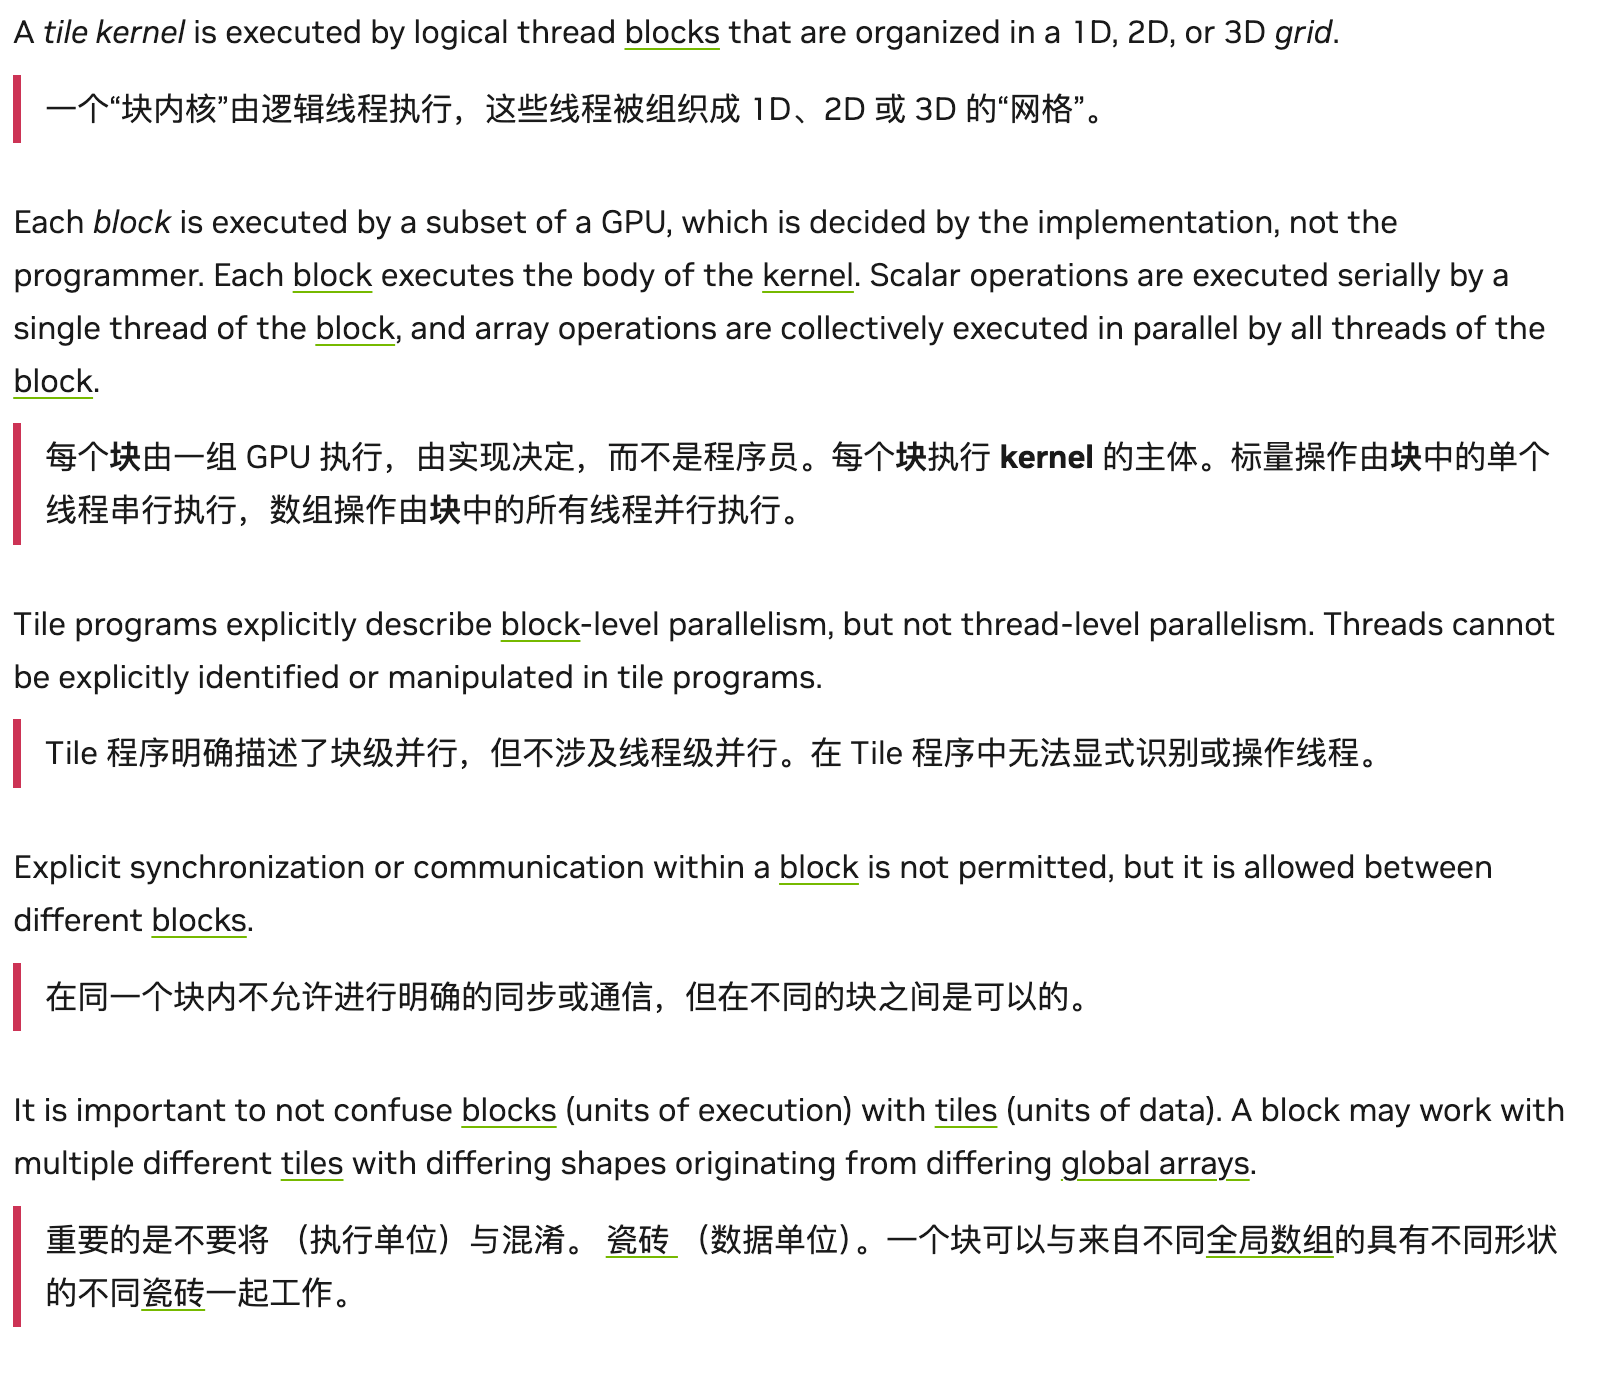 在官方文档里写的说明中,重点有几个:1. 不再是之前
 CUDAC 的线程级别操作粒度,而是以一个 Block 的线程块进行操作;2. Tile 是对数据的切分,不是对执行单元的切分,这是两个平面。
2.2 Tile & Array
几个容易混淆的点:
**Array**基本上还是**python**的**Array**对象,是有内存的分配的实体对象,包括了边界和实际存储的数据**TIle**是对数据的抽象理解,Tile 的每个维度都应该是 2的幂,且只能用于 Device 部分代码中。
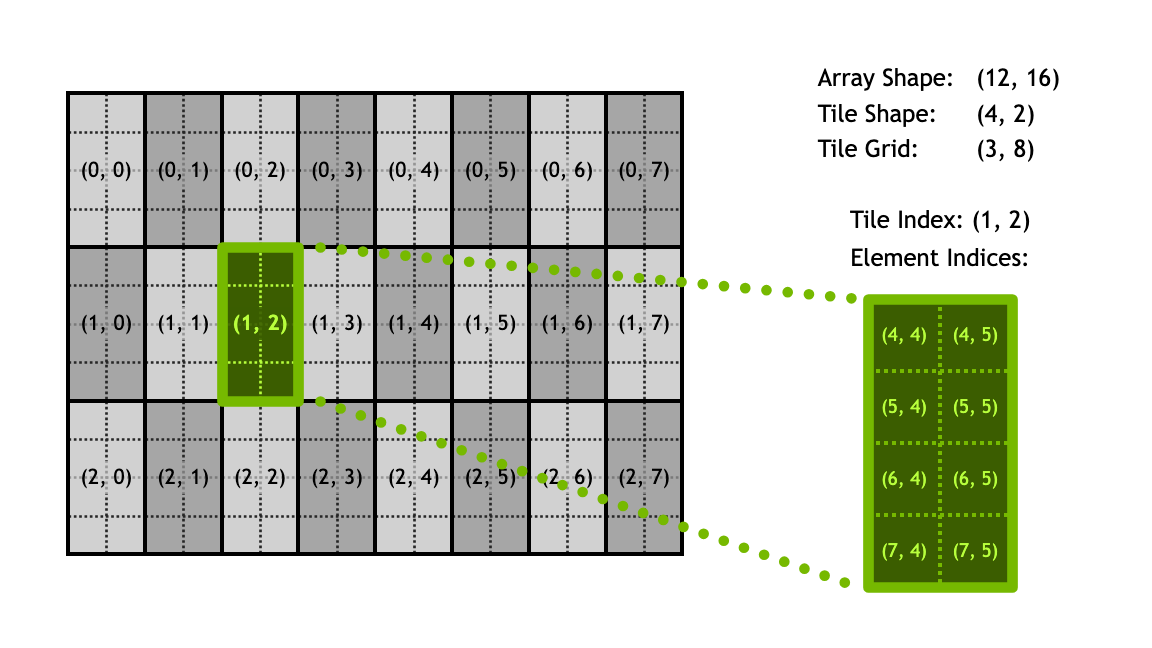
一个较为简单的对应关系如上图所示,Tile 的index 只表示切分成 Tile 后某个 Tile 的位置,里面的元素对应,还需要 Array 的 shape demensions 进行辅助定位。其实也就是 Cutlass 的 shape 体操,这里不多赘述。
Tile之间支持自动padding。会按照最后一个维度进行对齐操作。比如一个是[32,1,64], 一个是[64,2],这俩 tile 之间对齐操作是:第二个 tile 进行 padding,变成:[1, 64, 64]. 可以看到,padding 的逻辑就是:如果一个 dim 上,两个 tile 中有任意一个为 1,那就 OK,如果没有,那就得 padding 到较大值,维度不够,就在左侧加 1。Tile的消费顺序需要干预。如下图所示,还是 Cutlass 中那一套消费者-生产者模型,只不过简化了许多,降低了心智负担。
2.3 CuTile VS CUDAC
这次变化很大,不再是把 DSL 翻译成 CUDAC,然后再交给编译器,而是直接能够编译出对应的机器码,和 CUDAC 已经平起平坐了。这次区分这俩模型,主要也是把 SIMD 和 SIMT 的前端使用语法给统一一下,同时支持两种写法。
3. 简单的性能调优
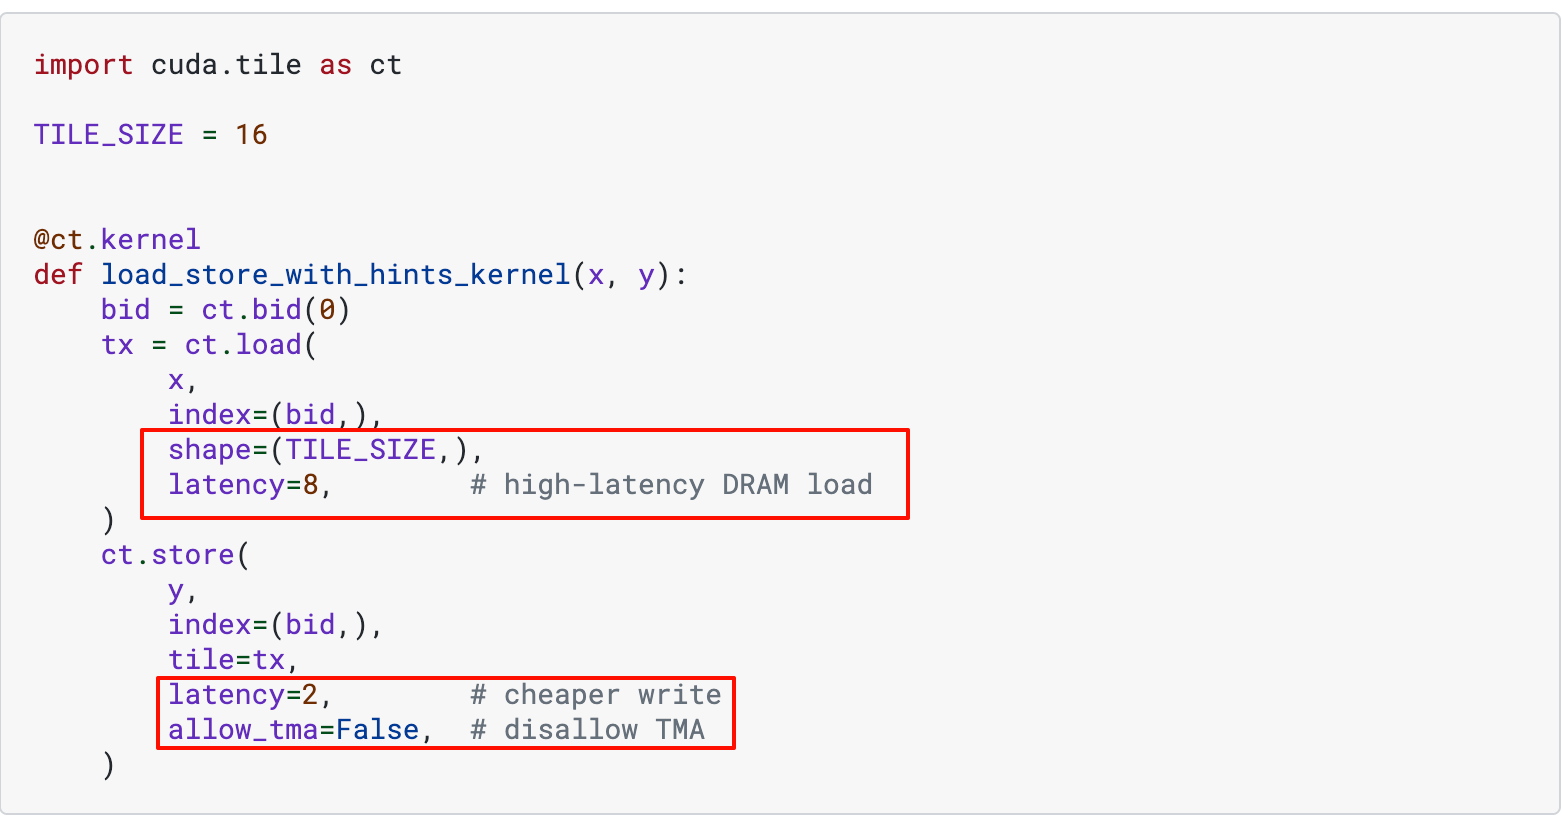
既然已经加入了类 Triton 的路线,自然是不需要程序员耗费心力去花费大量时间调优的;但是也给了一些 trick trigger,用于手动控制编译器的编译等级。(我理解其实是这块的编译器没做好完全的优化,只能先丢出来给用户自己不断设置 magic number 进行调优)。比如下面这些:
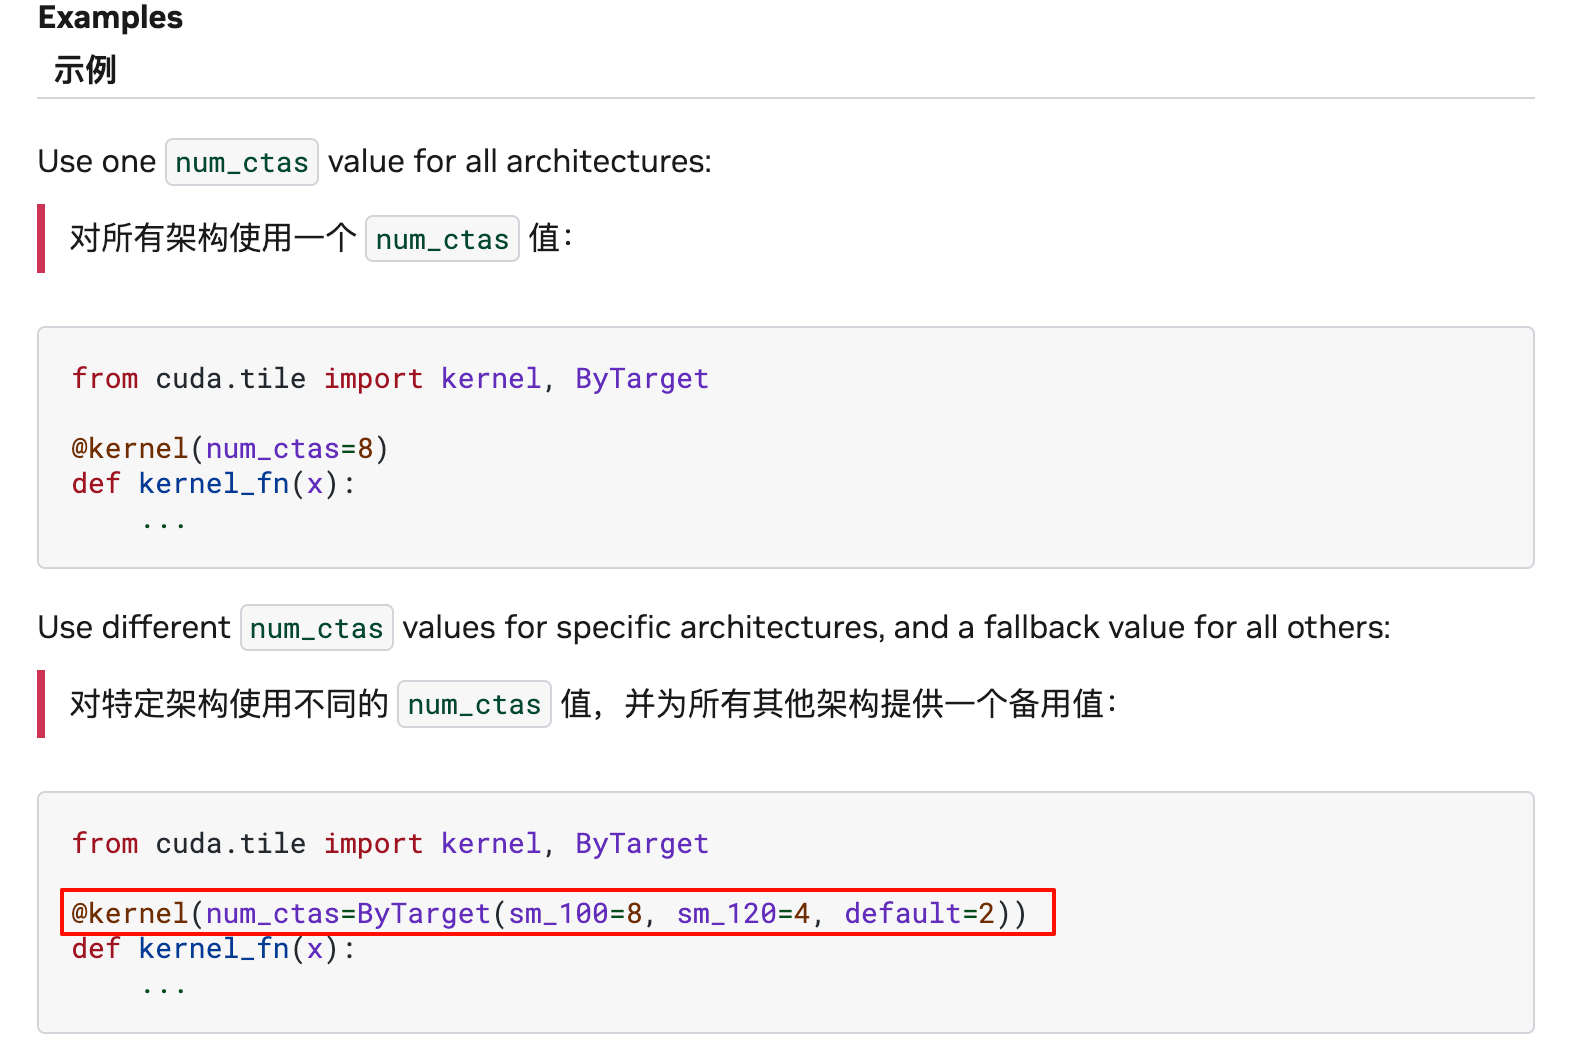
- 计算的 num_ctas.
- IO 操作的延迟指示(表示 IO 量有多大),以及是否使用 MMA
4. 实践代码
4.1 官方示例
[!info] cutile-python/samples at main · NVIDIA/cutile-python
cuTile is a programming model for writing parallel kernels for NVIDIA GPUs - NVIDIA/cutile-python
https://github.com/NVIDIA/cutile-python/tree/main/samples
如上面所示,NV 官方是给了一部分简单的示例的,需要的时候可以自行查询并学习。
4.2 GEMM学习
4.2.1 核心 Kernel
@ct.kernel(num_ctas=ct.ByTarget(sm_100=8))
def matmul_kernel(A, B, C,
                  tm: ConstInt,         # Tile size along M dimension (rows of C)
                  tn: ConstInt,         # Tile size along N dimension (columns of C)
                  tk: ConstInt):        # Tile size along K dimension (inner product dimension)
    """
    cuTile kernel for performing matrix multiplication C = A @ B.

    This kernel uses a tiled approach, where each block
    computes a `tm` x `tn` tile of the output matrix C. The computation
    involves iterating over the K-dimension in chunks of `tk`.

    Args:
        A: Input matrix A (M x K).
        B: Input matrix B (K x N).
        C: Output matrix C (M x N).
        tm (ConstInt): The height of the output tile computed by this block.
                       Corresponds to rows of A and C.
        tn (ConstInt): The width of the output tile computed by this block.
                       Corresponds to columns of B and C.
        tk (ConstInt): The depth of the inner loop (K-dimension) tile size.
                       Corresponds to columns of A and rows of B.
    """
    GROUP_SIZE_M = 8
    M = A.shape[0]
    N = B.shape[1]
    bidx, bidy = swizzle_2d(M, N, tm, tn, GROUP_SIZE_M)

    # Calculate the total number of tiles along the K-dimension that need to be processed.
    # `ct.num_tiles(A, axis=1, shape=(tm, tk))` means:
    #   "View A as an MxK tensor tiled by (tm, tk), and return the number of tiles along
    #    axis 1 (the K dimension)."
    # We pass shape=(tm, tk) to describe the 2D tiling, only `tk` matters for axis=1.
    num_tiles_k = ct.num_tiles(A, axis=1, shape=(tm, tk))

    # Initialize an accumulator for the current output tile (tm x tn).
    # It's common practice to use `float32` for accumulation even with `float16` inputs
    # to maintain higher precision during the sum-reduction of the matrix multiplication.
    accumulator = ct.full((tm, tn), 0, dtype=ct.float32)
    zero_pad = ct.PaddingMode.ZERO

    # Convert fp32 to tf32 to use tensorcore
    dtype = ct.tfloat32 if A.dtype == ct.float32 else A.dtype

    # K-dimension loop: Iterate over the K-dimension in chunks of 'tk'.
    # In each iteration, a `tm` x `tk` tile from A and a `tk` x `tn` tile from B
    # are loaded, multiplied, and accumulated.
    for k in range(num_tiles_k):
        # Load tile from matrix A.
        # The `index=(bidx, k_tile_idx)` specifies which (M-tile, K-tile) to load
        # from global memory A. `shape=(tm, tk)` defines the size of this tile.
        a = ct.load(A, index=(bidx, k), shape=(tm, tk), padding_mode=zero_pad).astype(dtype)

        # Load tile from matrix B.
        # The `index=(k_tile_idx, bidy)` specifies which (K-tile, N-tile) to load
        # from global memory B. `shape=(tk, tn)` defines the size of this tile.
        b = ct.load(B, index=(k, bidy), shape=(tk, tn), padding_mode=zero_pad).astype(dtype)

        # Perform Matrix Multiplication for the current tiles.
        # `ct.mma` computes the product of the two loaded tiles and accumulates the result.
        accumulator = ct.mma(a, b, accumulator)

    # Convert the final accumulated result to the desired output data type (C.dtype).
    # This might downcast from float32 to float16 if the output is float16.
    accumulator = ct.astype(accumulator, C.dtype)

    # Store the computed tile to the global memory of the output matrix C.
    # The `(bidx, bidy)` directly corresponds to the tile's position in the 2D output matrix.
    ct.store(C, index=(bidx, bidy), tile=accumulator)
具体来说,我们可以逐行分析:
@ct.kernel(num_ctas=ct.ByTarget(sm_100=8))这里给出编译器手动提示,SM_100 架构上,使用的ctas数目为 8 个函数输入:
tm,tn,tk, 根据注释,是站在输出的角度进行任务切分的,即一次 Kernel,负责计算一个输出的一部分,也就是[tm, tn],tk用于在计算中,进一步切分输入的A 和 B的大矩阵块。GROUP_SIZE_M=8,提示了切分 A矩阵时,M 方向,最多切分成 8 组。bidx, bidy = swizzle_2d(M, N, tm, tn, GROUP_SIZE_M)这里调用了一个子函数,用于获取当前计算到 C 矩阵的哪个小块了(因为代码里启动任务时,grid 就是一维)。计算过程如下面代码所示。def swizzle_2d_from_bid(M, N, tm, tn, GROUP_SIZE_M, bid): # Get the global IDs of a given block in a 1D grid. # 分别计算 M/N 方向 tile 总数(上取整) num_bid_m = ct.cdiv(M, tm) num_bid_n = ct.cdiv(N, tn) # 定义一组包含多少 block(M 方向 group_size_m 个 × N 方向 num_bid_n 个) num_bid_in_group = GROUP_SIZE_M * num_bid_n # 当前 block 属于第几个 M 方向大组 group_id = bid // num_bid_in_group # 该组起始的 M 方向 tile 索引 first_bid_m = group_id * GROUP_SIZE_M # 处理最后一组不足 8 行的情况 group_size_m = min(num_bid_m - first_bid_m, GROUP_SIZE_M) # 组内按行循环分配 M 方向 tile 索引 bid_m = first_bid_m + (bid % group_size_m) # 组内再按列计算 N 方向 tile 索引 bid_n = (bid % num_bid_in_group) // group_size_m return bid_m, bid_n def swizzle_2d(M, N, tm, tn, GROUP_SIZE_M): # Get the global IDs of the current block in a 1D grid. bid = ct.bid(0) return swizzle_2d_from_bid(M, N, tm, tn, GROUP_SIZE_M, bid)
[!important]
==这里我会有一个疑惑,明明在划分任务时,已经给每个 CTA 划分好了任务,为何还要在 M 方向再划分一个大组?强制临近的 8 个 CTA,顺序分配C 的[x,y:y+8]这竖着的 8 个任务块。这其实是一种====手动的 Swizzle 操作====,使得多个 CTA 之间,可以====共享一块 B 的输入====,从而加速计算。==
- 剩下的代码就很直白了,就是加载,计算,存储了,这部分属于没有什么解释空间了。
4.2 简单调优
可以观察到上面的 Kernel 代码中有一些可以优化的点:
num_ctas=2, 这个大小可以调整为 8. 这是 SM100 架构的最大设置。对
tm,tn,tk做修改,针对 FP8 的输入 type,可以放大一次处理的数据量,示例代码里的设置过于保守,无法充分发挥出UMMA指令的威力。
    if A.dtype.itemsize == 2:  # Likely torch.float16 or torch.bfloat16
        tm, tn, tk = 128, 256, 64  # Larger tiles for Tensor Core friendly types
    elif A.dtype.itemsize == 1:
        tm, tn, tk = 512, 512, 512
    else:# Likely torch.float32 or other
        tm, tn, tk = 32, 32, 32   # Smaller, more general tiles
至此,简单的优化其实已经结束了~。针对同一个 shape 的 FP8 的 GEMM 测试 (M = 320, N = 32576, K = 7168),最后实测结果,cutile 的版本能够达到 130us,而 DeepGEMM 库的结果为77us。说明还有很大的优化空间~
5. 进一步调优
参考 Cutile 官方给的 TileGym 库(一个利用 Cutile 语言,进行极限性能优化的更加 fancy 的库)的实现,我们可以观察到性能的大幅提升。下面会进行详细的对比分析。
5.1 static-persistent-kernel
persistent-kernel 意味着 CTA 在执行计算后不会被重新调度,而是继续在硬件上完成任务,从而减轻了调度器的负担,进而避免了来回 launch的一部分开销,从而提升性能。当然, 切换到persistent 后,每个 CTA 被分配到的输出矩阵的部分也会变多,就需要把上面的 Swizzle 改一下逻辑,以及核心的 matmul 中多一层外循环来处理多个 tile。核心的改动如下。
5.1.2 任务分配拆分
def _compute_bid(tile_id, num_bid_in_group, num_bid_m, GROUP_SIZE_M):
    group_id = tile_id // num_bid_in_group # num_bid_in_group = GROUP_SIZE_M * num_bid_n, 所以这类是对分配到的 tile_id 按照 M 方向进一步分组
    first_bid_m = group_id * GROUP_SIZE_M # 上面是整除,这里拿到分组开始的m的编号
    group_size_m = ct.minimum(num_bid_m - first_bid_m, GROUP_SIZE_M) # 兼容尾处理,如果剩余的 m 的块不够 GROUP_SIZE_M, 按实际的来
    bid_m = first_bid_m + (tile_id % group_size_m) # 拿到全局视角下的 m 块的编号
    bid_n = (tile_id % num_bid_in_group) // group_size_m # 拿到全局视角下的 n 的编号
    return bid_m, bid_n
如上面这段分配 bid 的代码所示,其实类似于上文的 Swizzle 2d 函数。只不过是分配逻辑改了下。
5.1.3 启动命令&自动调优
def cutile_autotune_static_persistent_matmul(stream, a, b, c, M, N, K, trans_a, trans_b):
    NUM_SMS = torch.cuda.get_device_properties("cuda").multi_processor_count
    ct_experimental.autotune_launch(
        stream,
        grid_fn=lambda cfg: (
            min(NUM_SMS // cfg.num_ctas, ceil(M / cfg.TILE_SIZE_M) * ceil(N / cfg.TILE_SIZE_N)) * cfg.occupancy, # 一维grid启动,不超过可调用的 ctas 数目以及针对输出分配的块的数目
            1,
            1,
        ),
        kernel=static_persistent_matmul_kernel,
        args_fn=lambda cfg: (
            a,
            b,
            c,
            M,
            N,
            K,
            cfg.TILE_SIZE_M,
            cfg.TILE_SIZE_N,
            cfg.TILE_SIZE_K,
            trans_a,
            trans_b,
            cfg.GROUP_SIZE_M,
        ),
        hints_fn=lambda cfg: {
            "num_ctas": cfg.num_ctas,
            "occupancy": cfg.occupancy,
        },
        search_space=_static_persistent_matmul_autotune_configs,
    )
    return c
如上代码所示,使用了 ct_exp 的自动调优功能,帮助在一些 config 列表中,找出最合适的配置进行算子计算。
5.2 base结果
使用上述经过一定调优后的代码进行测试,同样的 shape 下,这次的矩阵乘的耗时来到了**87.5us**, 很接近 deepgemm 的数据了,约等于88% 的性能水平。
5.3 榨干性能
可以看到源代码中,config 设置的比较少,但是实际上,我们可以循环遍历 config,从而榨干最后一滴性能.
def _static_persistent_matmul_autotune_configs():
    """
    Iterator of autotune configurations for static persistent matmul kernel.
    """
    gpu_capability = torch.cuda.get_device_capability()
    tile_sizes = (32,64,128,256,512)
    num_ctas_values = (1, 2, 4, 8)
    group_size_m = 8

    if gpu_capability in [(12, 0), (12, 1)]:
        # sm120, sm121
        occupancy_values = (1, 2, 4)
    else:
        # sm100 (Blackwell)
        occupancy_values = (1,)

    for tile_m in tile_sizes:
        for tile_n in tile_sizes:
            for tile_k in tile_sizes:
                for num_ctas in num_ctas_values:
                    for occupancy in occupancy_values:
                        yield SimpleNamespace(
                            TILE_SIZE_M=tile_m,
                            TILE_SIZE_N=tile_n,
                            TILE_SIZE_K=tile_k,
                            GROUP_SIZE_M=group_size_m,
                            num_ctas=num_ctas,
                            occupancy=occupancy,
                        )
效果显著。虽然遍历 config 调优的时候很慢,但是最后性能是满意的:80us,已经几乎等于 deepgemm 苦心优化的算子性能了。